5 Cookbook
![]()
The Cookbook is a collection of solution articles helping you with some specific, narrow problems.
Commands
How to create command ?
Symfony Console is the one package you will probably use to build a PHP CLI app. It's of one the easiest Symfony components. Why? You only create Application class, add your Command class and you are ready to go.
Is is true that Symfony Console Component was one of the most stable parts of the framework and many people have already been using it for several months in many projects as it makes it really easy to develop this kind of software. And of course, everything is done in a really cool way, as many of the parts of Symfony.
Thanks to this component we can really say Bye Bye to our old unfriendly PHP Cron interfaces and start nice coloring in our outputs!
This package helps you to create applications like Composer, PHP-CS-Fixer, PHP_CodeSniffer or Statie, that generates this website.
So in general, to build applications where you:
- need to access CLI,
- need to be fast - imports, crons, feeds or asynchronous operations
- and don't need any browser rendering.
Application - This is the entry point. It contains all commands and routes arguments to them. Something like Application is in Nette or HttpKernel is in Symfony.
Command - Handles input data, processes them and return result to the output. Something like Presenter or Controller. One application can have many commands.
What Belongs to Command? Before diving into our first command, there is important rule that we want to share with you. In many resources you find business logic inside Commands. That is convenient in the begging, but difficult to unlearn later building more commands.
Commands is something like Presenter or Controller, something like Delegator Pattern. Like Controller, it should only delegate arguments to other services and return result to the output.
This rule will help you to easily avoid:
- using command to run another command
- using command in controller
- using controller in command
- Very common, very coupled. You would never use controller inside another controller, right?
Ok, now you know this. So lets create your first command!
Commands are defined in classes which must be created in the Command namespace of your plugin or bundle (e.g. TestPlugin\Command) and their names must end with the Command suffix.
To get started, locate your plugin where you want to create your command (in this case, our plugin will be EmpireTranslationsPlugin) and create a folder on it with the name Command. Inside the Command folder, create a new class with the name InsertDefaultLanguageToParametersYmlCommand.php.
Probably, your consoles are not only for write some text in the console. You can access all the services from the container within a command i.e Doctrine, Translator etc.
You just need to include the ContainerAwareCommand class into your command and instead of extend the Command class it needs to extend the ContainerAwareCommand class and you'll be able to access the container as described below, otherwise you'll find errors like Attempted to call and undefined method named "getContainer" of class YourCommand.
Finally, add the following code to the previously created class (do not forget to change the namespace according to your own plugin or bundle):
<?php
namespace Plugins\EmpireTranslationsPlugin\Command;

use Symfony\Bundle\FrameworkBundle\Command\ContainerAwareCommand;
use Symfony\Component\Console\Input\InputInterface;
use Symfony\Component\Console\Output\OutputInterface;
use Symfony\Component\Yaml\Dumper;
use Symfony\Component\Yaml\Parser;

/**
 * Class InsertDefaultLanguageToParametarsYmlCommand
 */
class InsertDefaultLanguageToParametersYmlCommand extends ContainerAwareCommand
{

    /**
     * Defines name, description and input params of command
     */
    protected function configure()
    {
        $this->setName('empire-cli:dump-default-language-to-parameters')
            ->setDescription('Dump default language from DATABASE to parameters.yml');
    }

    /**
     * @param InputInterface  $input
     * @param OutputInterface $output
     *
     * @return int|null|void
     */
    protected function execute(InputInterface $input, OutputInterface $output)
    {
        try {
            $parametersYml = $this->getContainer()->getParameter('kernel.project_dir').'/app/config/parameters.yml';
            $defaultLanguage = $this->getContainer()->get('alligator.language_manager')->getDefaultLanguageLocale();

            $parser = new Parser();
            $parameters = $parser->parse(file_get_contents($parametersYml));

            $parameters['parameters']['locale'] = $defaultLanguage;

            $dumper = new Dumper();
            file_put_contents($parametersYml, $dumper->dump($parameters, 2));

            $output->writeln('Default language('.$defaultLanguage.') included to parameters.yml');
        } catch (\Exception $ex) {
            $output->writeln('Error! '.$ex->getMessage());
        }
    }
}
How to work with users ?
Note that is recommended and is a good practice to create your own custom services to handle all the logic (create,edit, find etc.).
This chapter will tell you more about the way F-webshop handles users, roles and permissions. There are also a subchapters dedicated to addresses and images of your customers.
Database Model
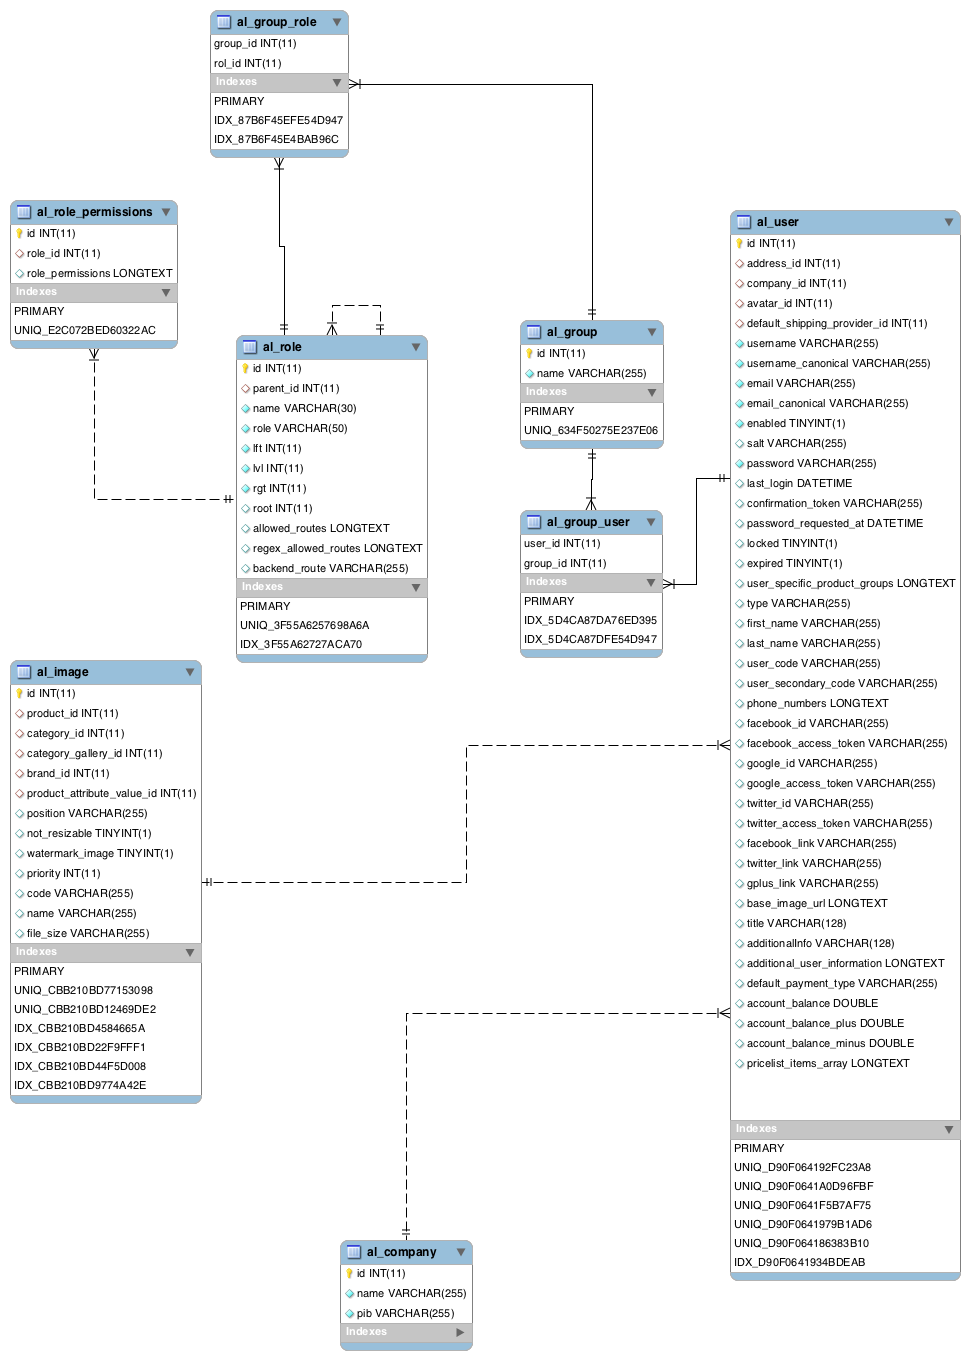
User Entity
The User entity was created to collect data about registered customers of the system.
For deatails go to API docs:
How to manage users, groups and roles ?
use Alligator\Model\Core\Resource\Model\UserTypes;
use Alligator\Model\UserBundle\Entity\Address;
use Alligator\Model\UserBundle\Entity\Group;
use Alligator\Model\UserBundle\Entity\Role;
use Plugins\EmpirePluginsBundle\Business\Event\RolePermissionEvent;
use Plugins\EmpireUserPlugin\Model\RolePermissions;
use Plugins\EmpireUserPlugin\Model\RolePermissionTypes;
use Symfony\Bundle\FrameworkBundle\Command\ContainerAwareCommand;

$userRepository = $this->getContainer()->get('alligator.user_repository');
$userManager = $this->getContainer()->get('fos_user.user_manager');
//ROLES - We will now create 3 defaults ROLE
//create admin role
$adminRole = new Role('ROLE_ADMIN');
$adminRole->setName('ADMIN');
$adminRole->setBackendRoute('backend_home');
// Admin role has access to backend part
$adminRole->setRegexAllowedRoutes(['/.*\/backend\/.*/', '/.*\/private\/json\/.*/']);

//Create default user role
$userRole = new Role('ROLE_USER');
$userRole->setName('USER');
//Create company role
$companyRole = new Role('ROLE_COMPANY');
$companyRole->setName('COMPANY');


/**
* ROLE PERMISSIONS
*/
$event = new RolePermissionEvent();
//event for custom roles
$this->getContainer()->get('event_dispatcher')->dispatch('default.role.permissions', $event);
$eventPermissions = $event->getPermissions();
$allPermissions = array(
    RolePermissionTypes::CAN_SEE_PRICE_UNDERSCORE, RolePermissionTypes::CAN_SEE_PRICE_WITH_RABAT_UNDERSCORE,
    RolePermissionTypes::CAN_SEE_QUANTITY_UNDERSCORE, RolePermissionTypes::CAN_SEE_QUANTITY_LIGHT_UNDERSCORE,
    RolePermissionTypes::CAN_SEE_PARTIAL_QUANTITY_UNDERSCORE
);

$adminPermissions = (new RolePermissions())->setRole($adminRole)->setRolePermissions(array_key_exists('ROLE_ADMIN', $eventPermissions) ? $eventPermissions['ROLE_ADMIN'] : $allPermissions);
$userPermissions = (new RolePermissions())->setRole($userRole)->setRolePermissions(array_key_exists('ROLE_USER', $eventPermissions) ? $eventPermissions['ROLE_USER'] : $allPermissions);
$companyPermissions = (new RolePermissions())->setRole($companyRole)->setRolePermissions(array_key_exists('ROLE_COMPANY', $eventPermissions) ? $eventPermissions['ROLE_COMPANY'] : $allPermissions);

/**
* SET ROLE HIERARCHY
*/
$userRole->setParent($adminRole);
$companyRole->setParent($adminRole);

/**
* GROUPS
*/
$adminGroup = new Group('ADMIN');
$userGroup = new Group('PERSONAL');
$companyGroup = new Group('COMPANY');

$em = $this->getContainer()->get('doctrine')->getManager();
/**
* GROUPS AND ROLES
*/
$adminGroup->addRole($adminRole);
$userGroup->addRole($userRole);
$companyGroup->addRole($companyRole);

/**
* PERSISTING ROLES
*/
$em->persist($adminRole);
$em->persist($companyRole);
$em->persist($userRole);

/**
* PERSISTING GROUPS
*/

$em->persist($adminGroup);
$em->persist($userGroup);
$em->persist($companyGroup);

/**
* PERSISTING ROLE PERMISSIONS
*/
$em->persist($adminPermissions);
$em->persist($userPermissions);
$em->persist($companyPermissions);

/**
* CREATING DEFAULT ADMIN USER
*/
$user = $userManager->createUser();
$user->setUsername($userName)
    ->setEmail('staging.fsd.rs@gmail.com')
    ->setFirstName('Emperor')
    ->setLastName('Admin')
    ->setType(UserTypes::PERSONAL)
    ->setPassword($this->getContainer()->get('security.password_encoder')->encodePassword($user, $input->getArgument('password')))
    ->setEnabled(true)
    ->setAddress((new Address())->setCity('Belgrade')->setCountry('Serbia')->setPostcode('11000')->setStreet('Rule street')->setStreetNumber('8'))
    ->addGroup($adminGroup);


/**
* PERSISTING USER
*/
$userManager->updateUser($user);
$em->flush();

//How to edit user ?
$userDB = $userRepository->getUserById($user->getId());
$userDB->setFirstName('New First Name');
$userRepository->editUser($userDB);
Caching
F-Webshop comes with service that provided necessary functions with working with caching provider. Service is registered as empire.shop.cache.
Two most used commands from cache service are set and get.
Examples of persisting values from cache:
$container->get('empire.shop.cache')->set(string $cacheKey, mixed $data [, $expireResolution [, $expireTTL [, $flag]]]);
and retrieving:
$container->get('empire.shop.cache')->get(string $cacheKey);
Caching categories
F-webshop cache html for representing all categories in all available languages on frontend.
Cache keys used for caching categories are constants from CategoryRepository class:
- CATEGORY_TREE_QUERY__RESULT_CACHE_BACKEND_EDIT - cached categories used in backend
- CATEGORY_TREE_QUERY__RESULT_CACHE - cached html used for menu on frontend
- CATEGORY_BLOCKS_RESULT_CACHE - cached categories used in block elements
F-webshop handles re-caching all categories after persisting or editing categories on backend(event is dispatched for re-cache that is executed on terminate).
But in case you need to programmatically re-cache categories you just need to call setTreeCategoriesToCache method from AlligatorCategoryExtension class.
<?php

namespace Alligator\Business\Extension\Category;

/**
 * Class AlligatorCategoryExtension
 */
class AlligatorCategoryExtension extends \Twig_Extension
{
    ...

        /**
         * Set tree categories to cache
         * @param null        $locale
         * @param bool        $useFromCache
         * @param string|null $slug
         */
        public function setTreeCategoriesToCache($locale = null, $useFromCache = true, $slug = null)
        {
            ...
        }

    ...
}
Caching menu items
F-webshop cache html for representing all menu items in all available languages on frontend.
F-webshop handles re-caching all menu items after persisting or editing menu items on backend(event is dispatched for re-cache that is executed on terminate).
But in case you need to programmatically re-cache categories you just need to call setMenuTreeToCache method from MenuBuilderExtension class.
<?php

namespace Plugins\EmberMenuPlugin\Business\Extension;

/**
 * Class AlligatorCategoryExtension
 */
class MenuBuilderExtension extends \Twig_Extension
{
    ...

        /**
         * Set to cache menu tree html
         *
         * @param string|null $locale
         * @param bool        $useFromCache
         */
        public function setMenuTreeToCache($locale = null, $useFromCache = true)
        {
            ...
        }

    ...
}
Customizing search
In some cases you may be needing to customize search options to your application in order to cover unique business needs.
In F-webshop, currently it is possible to customize:
- default sort field
- default search fields
- add additional query data
- limit data on search - depending on user, brand, etc..
- custom populate product search options
Define default sort field
If sort fields are not define on product search(initial load of category/search page), shop will use default sort fields. Variable holding information about what field to sort by and type of sort(ascending/descending) is located in ProductRepository class under PRODUCT_DEFAULT_SORT_FIELD constant.
<?php

namespace Alligator\Business\Database\Product;

/**
 * Class ProductRepository
 */
class ProductRepository extends EntityRepository implements AbstractBlockElementRepositoryInterface
{

    ...

    /**
     * List of product fields for sort
     * @var array
     */
    public const PRODUCT_DEFAULT_SORT_FIELD = ['field' => 'product_name', 'order' => 'ASC', 'title' => 'Product name'];

    ...

}
Before using default sort from ProductRepository class, event is dispatched to retrieve specific default sort for implementation. Event is dispatched in ProductManager class.
<?php

namespace Alligator\Business\Manager\Product;

/**
 * Class ProductManager
 */
class ProductManager implements BasicEntityManagerInterface, ProductManagerInterface, CSVManagerInterface, JQGridInterface
{

    ...

    /**
     * Get default sort field
     * @return array
     */
    public function getDefaultSortField()
    {
        return ($result = $this->eventContainer->getDefaultSortField()) ? $result : ProductRepository::PRODUCT_DEFAULT_SORT_FIELD;
    }

    ...

}
If you wish to override default sort, all you need to do is create listener that watches for product.default.sort.field event and return array of default sort field name, title and order of sort.
Registring listener:
f_webshop.listener.testlistener:
    class: Plugins\TestPlugin\Business\Event\TestEventListener
    tags:
        - { name: kernel.event_listener, event: product.default.sort.field, method: getDefaultSortField }
And listener class:
<?php

use Alligator\Business\Event\AbstractEvent\EventWithResult;

class TestEventListener
{
    /**
     * @param EventWithResult $event
     */
    public function getDefaultSortField(EventWithResult $event)
    {
        $event->setResult([
            'field' => 'test_model_field_name',
            'title' => 'test_title',
            'order' => ['ASC'/'DESC']
        ]);
    }
}
Define default search fields
Every time user search products, shop will compare provided string with predefined fields. Variable holding information about what fields to include in search is located in ProductRepository class under PRODUCT_SEARCH_FIELDS constant.
<?php

namespace Alligator\Business\Database\Product;

/**
 * Class ProductRepository
 */
class ProductRepository extends EntityRepository implements AbstractBlockElementRepositoryInterface
{

    ...

    /**
     * List of product fields for search
     * @var array
     */
    public const PRODUCT_SEARCH_FIELDS = array('p.product_name', 'p.erp_code', 'p.description', 'p.sku', 'p.tags', 'p.keywords', 'p.additional_keywords', 'p.product_search_options', 'p.product_search_string', 'pt.name_translation', 'pt.short_description_translation', 'pt.description_translation');

    ...

}
Before using default search fields from ProductRepository class, event is dispatched to retrieve specific default search fields for implementation. Event is dispatched in ProductManager class.
<?php

namespace Alligator\Business\Manager\Product;

/**
 * Class ProductManager
 */
class ProductManager implements BasicEntityManagerInterface, ProductManagerInterface, CSVManagerInterface, JQGridInterface
{

    ...

  /**
     * Find search fields
     * @return array
     */
    public function getSearchFields()
    {
        return ($result = $this->eventContainer->getSearchFields()) ? $result : ProductRepository::PRODUCT_SEARCH_FIELDS;
    }

    ...

}
If you wish to override default search fields, all you need to do is create listener that watches for product.search.fields event and return array of default search field's names.
Registring listener:
f_webshop.listener.testlistener:
    class: Plugins\TestPlugin\Business\Event\TestEventListener
    tags:
        - { name: kernel.event_listener, event: product.search.fields, method: getSearchFields }
And listener class:
<?php

use Alligator\Business\Event\AbstractEvent\EventWithResult;

class TestEventListener
{
     /**
         * @param EventWithResult $event
         */
        public function getSearchFields(EventWithResult $event)
        {
            $event->setResult(array(
                'p.product_name',
                'p.erp_code',
                [
                    'value' => 'p.sku' ,
                    'full_field_search' => true
                ],
                'pt.name_translation',
            ));
        }
}
Add additional query data
In order to define specific sort for implementation based on all parameters from search wrapper we will need to hook on product.additional.search.data event and return function that will do the sort.
Event for retrieving additional query data is located in ProductManager class under getAdditionalSearchData method.
<?php

namespace Alligator\Business\Manager\Product;

/**
 * Class ProductManager
 */
class ProductManager implements BasicEntityManagerInterface, ProductManagerInterface, CSVManagerInterface, JQGridInterface
{

    ...

    /**
     * Find additional search data
     * @return array
     */
    public function getAdditionalSearchData()
    {
        return ($result = $this->eventContainer->getAdditionalSearchData()) ? $result : [];
    }

    ...

}
To add additional query data to search all we need to do is register listener:
f_webshop.listener.testlistener:
    class: Plugins\TestPlugin\Business\Event\TestEventListener
    tags:
        - { name: kernel.event_listener, event: product.additional.search.data, method: getAdditionalSearchData }
And listener class:
<?php

use Alligator\Business\Event\AbstractEvent\EventWithResult;

class TestEventListener
{
    /**
       * @param EventWithResult $event
       */
      public function getAdditionalSearchData(EventWithResult $event)
      {
          /**
           * @param ProductSearchWrapper $searchWrapper
           * @return null|string
           */
          $func = function ($searchWrapper) {
              //custom sort logic
          };

          $event->setResult([
              'sort_priority' => [
                  'active'   => true,
                  'function' => $func
                  //[, 'field'    => 'test_field_name']
              ]
          ]);
      }
}
Limit data on search
This is used when we need to change availability of product for specific implementation based on different parameters. For example: not all products are available for different payment types.
Before every product search product.availability.change.event event is dispatched to retrieve specific limitation.
In order to limit search, all we need to do is register listener:
f_webshop.listener.testlistener:
    class: Plugins\TestPlugin\Business\Event\TestEventListener
    tags:
        - { name: kernel.event_listener, event: product.availability.change.event, method: getChanges }
And a listener class:
<?php

use Alligator\Business\Event\AbstractEvent\EventWithResult;

class TestEventListener
{
   /**
    * @param ProductAvailabilityChangeEvent $event
    */
   public function getChanges(ProductAvailabilityChangeEvent $event)
   {
       // custom logic for excluding products from search
   }
}
Add JQGrid search for entity
Adding new jqgrid functionality to your application is a common usecase. You can imagine for instance, that after you created some new entity in your application, you want to represent and manipulate entity's data.
For that you will need to create html page and configure fields...
Creating html page that will represent data
Create new html page that will have:
...

<!-- Define table that will hold all data for entity and div that will hold pager information -->
<div class="jqGrid" role="tabpanel">
    <table id="jqGrid"></table>
    <div id="jqGridPager"></div>
</div>

...

<!-- Include jqgrid script(and script for specific language) -->
{% include constant('Plugins\\EmpirePluginsBundle\\Routing\\RouteThemeListener::SESSION_BACKEND_THEME_NAME') ~ '/Twig/Dashboard/jqgrid-locale.html.twig' %}
<script src="{{ asset('Resource/Global/js/jqgrid_universal_custom-compiled.js') }}"></script>

...

<!-- And define column names and column model -->
<script>
    let columnNames = [ /** Array of column titles */ ];
    let columnModel = [
        // Array of objects with property name, index, searchoptions, ...
        {name: 'id', index: 'id'},
    ];

    setUpjQgrid(
        'jqGrid',
        /** Route name that will return data */,
        Translator.trans(/** Title of table */),
        columnNames,
        columnModel,
        /** Route name that will manage deleting of entity */,
        /** Custom qury */,
        /** Sort params */
    );
</script>
Define configuration in manager and repository
Include jqgrid traits in entity manager and repository classes:
<?php

use Alligator\Adapter\JQGridInterface;
use Alligator\Adapter\JQGridManagerTrait;

/**
 * Class EntityConverter
 */
class EntityManager implements JQGridInterface
{
     use JQGridManagerTrait;

     ...
}
And repository:
<?php

use Alligator\Business\Database\JQGrid\JQGridTrait;
use Doctrine\ORM\EntityRepository;

/**
 * Class EntityConverter
 */
class EntityRepository extends EntityRepository
{
     use JQGridTrait;

     ...
}
Define configuration in converter
To be able to use jqgrid we just need to set simple configuration:
<?php

use Alligator\Adapter\JQGridConverter;
use Symfony\Component\HttpFoundation\Request;

/**
 * Class EntityConverter
 */
class EntityConverter extends JQGridConverter
{

    /**
     * EntityConverter constructor.
     */
    public function __construct(EntityManager $manager, Request $request, $param)
    {
        /** Call constructor of upper class to set class variables */
        parent::__construct($manager, $request, $param);

        /** Map fields that come from frontend */
        $this->searchFields = array(
            /** key => mapped property */
            'id' => EntityRepository::ALIAS.'.id',
        );

        /** And define which fields to use in query */
        $this->selectFields = array(
            EntityRepository::ALIAS.'.id as entity_id',
        );
    }
}
That’s all. You will now be able to use jqgrid on new entity.
JQGrid additional search parameters
In Converter you can define additional options for manipulating/filtering data.
If you want to retrieve informations from other tables just populate join property:
<?php

class EntityConverter
{
    /**
     * EntityConverter constructor.
     */
    public function __construct(EntityManager $manager, Request $request, $param)
    {
        ...

        /**
         * Define which field you want to join and his alias
         */
        $this->joinFields = array(
            ['join' => EntityRepository::ALIAS.'.joined_entity_name', 'alias' => EntityRepository::JOINED_ENTITY_ALIAS],
            ['join' => EntityRepository::ALIAS.'.joined_entity_name', 'alias' => EntityRepository::JOINED_ENTITY_ALIAS],
            ...
        );
    }
}
If you need to use group by after join, just add which field you want to use in group by(or multiple fields):
<?php

class EntityConverter
{
    /**
     * EntityConverter constructor.
     */
    public function __construct(EntityManager $manager, Request $request, $param)
    {
        ...

        /**
         * Define which field you want to use in group by
         */
        $this->groupBy = array(
            EntityRepository::ALIAS.'.id',
        );
    }
}
Additionally you can define where and custom search options:
<?php

class EntityConverter
{
    /**
     * EntityConverter constructor.
     */
    public function __construct(EntityManager $manager, Request $request, $param)
    {
        ...

        /**
         * @param \Doctrine\ORM\QueryBuilder $qb
         * @param array|null                 $additionalParams
         */
        $this->whereClosure = function ($qb, $additionalParams) {
            if (array_key_exists('search_param', $additionalParams)) {
                $qb->andWhere($qb->expr()->like(EntityRepository::ALIAS.'.field_name', $qb->expr()->literal('%'.$additionalParams['search_param'].'%')));
            }

            ...
        };

        /**
         * @param array                      $searchParams
         * @param \Doctrine\ORM\QueryBuilder $qb
         */
        $this->doCustomSearchOptionsClosure = function ($searchParams, $qb) {
            foreach ($searchParams[0] as $key => $param) {
                if (EntityRepository::ALIAS.'.field_name' === $key) {
                    if (-1 !== (int) $param) {
                        $qb->andWhere($key.' = '.$param);
                    }
                } else {
                    $qb->andWhere($qb->expr()->like($key, $qb->expr()->literal('%'.$param.'%')));
                }

                ...
            }
        };
    }
}
JQGrid additional customization
If methods for filtering data we have in application by default are not suitable for your needs, you can easily override them.
Manager and repository traits have three methods for manipulating data:
<?php

use Alligator\Adapter\JQGridWrapper;

class EntityManager/EntityRepository
{
    ...

    /**
     * @param array         $searchParams
     * @param array         $sortParams
     * @param array         $additionalParams
     * @param JQGridWrapper $jqGridWrapper
     *
     * @return mixed
     */
    public function searchForJQGRID($searchParams, $sortParams = array(), $additionalParams = array(), $jqGridWrapper = null)
    {
        // logic for filtering data by provided search params
    }

    /**
     * @param int           $page
     * @param int           $offset
     * @param array         $sortParams
     * @param array         $additionalParams
     * @param JQGridWrapper $jqGridWrapper
     *
     * @return mixed
     */
    public function findAllForJQGRID($page, $offset, $sortParams, $additionalParams = array(), $jqGridWrapper = null)
    {
        // logic for retrieving all data for provided page and offset
    }

    /**
     * @param array|null         $searchParams
     * @param array|null         $sortParams
     * @param array|null         $additionalParams
     * @param JQGridWrapper|null $jqGridWrapper
     *
     * @return mixed
     */
    public function getCountForJQGRID($searchParams = null, $sortParams = null, $additionalParams = array(), $jqGridWrapper = null)
    {
        // logic for counting number of rows for provided search params
    }

    ...
}
Events
Pretty much any time you interact with a Symfony application, behind the scenes (or under the hood if you prefer), a whole bunch of events are created, dispatched, listened for, and potentially, responded too.
You may have heard about events but wonder what they are. Simply, an event is something that has already happened. It might have happened only a few microseconds ago, but it is a 'historical' thing.
When working with a Symfony framework application, an event will be a plain old PHP class that you create. They tend to be quite small, with only getters, and no setters. To set we tend to use the constructor.
There's only one thing we must do to make our own events work with the Symfony framework, and that is to extend Event.
In this case, Event is shorthand for Symfony\Component\EventDispatcher\Event, which means our event class will need to:
use Symfony\Component\EventDispatcher\Event;
There are special tasks, that probably are hard to find in the official documentation or aren't easy to understand. One of these tasks is to do something after an user succesfully start a session (logging into your app) and you need to know when an user do that in order to do something extra (to add parameters in the session according to the email etc).
You could easily replace the "event listener" modifying the code in the bundle (vendor directory), however this is discouraged as it's a bad practice and your changes will be lost on any update, therefore is recommendable to add a login event listener instead.
In this article, you'll learn how to listen specifically for the login event when an user succesfully login to your app. Also, we will try to give you a small introduction to using the Symfony Event dispatcher component and how to implement it into your Symfony project. In a later post, we’ll go deeper into events and how we use them at F-Webshop.
But first, let me try to explain what event-driven development is. The very short version: instead of using one big class, you split up your code and let the smaller bits listen to a ‘event’. When this event is triggered, the dispatcher will execute a chain of classes with a well-defined responsibility, which all listen to that ‘event’.
The component is such a powerful tool because it provides all the necessary steps to make sure the chain is executed flawlessly:
- The Event class itself
- A dispatcher
- A Listener
- Debug tools
Creating an event
Symfony’s Event class is the base class for classes containing event data. This class itself doesn’t contain any event data. Instead, it is used by events that don’t pass state information to an event handler when an event is raised.
<?php

use Symfony\Component\EventDispatcher\Event;

class CustomEvent extends Event
{
     // Class functionality goes here
}
Dispatching the event
The event dispatcher is the central object of the event dispatcher system. Generally, a single dispatcher is created, which maintains a registry of listeners. When an event is dispatched via the dispatcher, it notifies all listeners registered with that event. There are a number of different types of dispatchers.
The basic type:
- EventDispatcher: The basic implementation of the dispatcher.
And a few special types:
- ContainerAwareEventDispatcher: Lazily loads listeners and subscribers from the dependency injection container.
- ImmutableEventDispatcher: A read-only proxy for an event dispatcher.
Listening for an event
The most common way to listen to an event is to use the EventListener class. This class allows you to subscribe to a single event. By configuration, you can decide if the EventListener runs the provided code in the chain or not.
You can also manipulate the execution chain by adding a ‘priority’ method in the ‘Tag’ context for your listener definition.
Services:
f_webshop.listener.testlistener:
    class: Plugins\TestPlugin\Business\Event\TestEventListener
    tags:
        - { name: kernel.event_listener, event: event.test, priority: 10 }
Next to the EventListener, there is also the EventSubscriber. This defines one or more methods that listen to one or various events. The main difference with the listeners is that subscribers tell the dispatcher what they’re listening to, while an EventListener listens only to what it’s configured for.
<?php

use Symfony\Component\EventDispatcher\EventSubscriberInterface;
use Symfony\Component\EventDispatcher\Event;

class TestEventSubscriber implements EventSubscriberInterface
{

    public static function getSubscribedEvents()
    {
            return [
                    "test.event" => [
                    ["taskA", 0],
                    ["taskB", -10],
                      ]
            ];
    }

    public function taskA(Event $event): void
    {
             // ...
    }

    public function taskB(Event $event): void
    {
            // ...
    }
}
And a services.yml:
f_webshop.listener.testsubscriber:
    class: Plugins\TestPlugin\Business\Event\TestEventSubscriber
    tags:
        - { name: kernel.event_subscriber }
For a given subscriber, different methods can listen to the same event. The order in which methods are executed is defined by the priority parameter of each method (the higher the priority the earlier the method is called).
How to add custom logic after login ?
You can choose whether you want to create an EventListener or an EventSubscriber.
- EventListener: The most common way to listen to an event is to register an event listener with the dispatcher. This listener can listen to one or more events and is notified each time those events are dispatched.
- EventSubscriber: This is very similar to the the EventListener, except that the class itself can tell the dispatcher which events it should listen to.
shop.custom.login.event
If you’d prefer to use an EventSubscriber, you need a UserLoginSubscriber:
use Alligator\Business\Event\AbstractEvent\EventWithResult;
use Alligator\Business\Manager\Settings\UserSettingsManager;
use Symfony\Component\EventDispatcher\Event;
use Symfony\Component\EventDispatcher\EventSubscriberInterface;
use Symfony\Component\HttpFoundation\Request;
use Symfony\Component\Templating\EngineInterface;

/**
* Class UserLoginSubscriber is injected as f_webshop.login.subscriber service. UserLoginSubscriber is listener class for handling a logic for dispatched events
*/
class UserLoginSubscriber implements EventSubscriberInterface
{
    /**
     * @var Request
     */
    protected $request;

    /**
     * @var UserSettingsManager
     */
    protected $userSettingsManager;

    /**
     * UserLoginListener constructor.
     * @param UserSettingsManager $userSettingsManager
     */
    public function __construct(UserSettingsManager $userSettingsManager)
    {
        $this->userSettingsManager = $userSettingsManager;
    }


    /**
     * {@inheritdoc}
     */
    public static function getSubscribedEvents()
    {
        return array(
            'shop.custom.login.event' => 'onLogin',
        );
    }

    /**
     * @param Event $event
     */
    public function onLogin(EventWithResult $event)
    {
        $currentSettings = $this->userSettingsManager->getCurrentUserSetting();
        if ($currentSettings->isIsB2BRegistration()) {
            $this->request = $event->getRequest();
            $data = 'Custom login success event';
            $this->request->getSession()->getFlashBag()->add('custom_login_message', $data);
        }
    }
}
And a services.yml:
  f_webshop.login.subscriber:
      class: Plugins\TestPlugin\Business\Event\UserLoginSubscriber
      arguments: ["@alligator.user_settings_manager"]
      tags:
          - { name: kernel.event_subscriber }
Great – you now know how to work with events! But do you know how to debug them?
Luckily, the Symfony console command provides you with some handy tools to debug your event flows:
php bin/console debug:event-dispatcher (full list)
php bin/console debug:event-dispatcher <event> (single event)
How to customize order after add to cart ?
Now we will learn how to change the order after the user has added the product to the basket.
order.after.cart.success
This event is dispatched in CheckoutManager class in doCartAction method. In this example, We will add custom note to order, and give some discount.
<?php

use Symfony\Component\EventDispatcher\EventSubscriberInterface;
use Symfony\Component\EventDispatcher\Event;
use Alligator\Model\OrderBundle\Entity\Order;
use Alligator\Model\OrderBundle\Entity\OrderItem;
use Alligator\Business\Event\Order\OrderEvent;
use Alligator\Model\OrderBundle\Entity\Adjustment;

class TestEventSubscriber implements EventSubscriberInterface
{

    public static function getSubscribedEvents()
    {
            return [
            'order.after.cart.success' => 'processOrderAfterAddToCart',
        ];
    }

    /**
     * @param OrderEvent $event
     * @return OrderEvent
     */
    public function processOrderAfterAddToCart(OrderEvent $event)
    {
         /** @var Order $order */
        $order = $event->getOrder();
        $order->setCheckoutComment($checkoutComment);

         /** @var OrderItem $item */
        foreach ($order->getItems() as $item) {
            /** see if item has adjustment already */
            /** @var Adjustment $adjustment */
            foreach ($item->getAdjustments() as $adjustment) {
                if ($adjustment->getLabel() === $this->adjustmentTitle) {
                    /** go to next item */
                    continue 2;
                }
            }
            // You can also change product's information
            //$product = $item->getProduct();
            $discount = new Adjustment();
            $discount->setLabel('Test discount');
            $discount->setAmount(-0.05);
            $discount->setNeutral(false);
            $item->addAdjustment($discount);

        }

        $order->calculateTotal();

        return $event->setResult($order);
    }
}
And a services.yml:
f_webshop.listener.testsubscriber:
    class: Plugins\TestPlugin\Business\Event\TestEventSubscriber
    tags:
        - { name: kernel.event_subscriber }
How to customise csv import?
In case you need custom csv import, here are the steps that you will need to take:
Create new/override page for importing desire entity
If you need custom logic for import, just override products-import.html.twig template in your plugin.
Tip: You can extend twig from backend theme and just override functions for import
Define custom logic for import
Next you need to create listener that will listen event dispatched for custom import.
name_of_the_listener:
    class: ClassNameWithNamespace
    tags:
         - { name: kernel.event_listener, event: [product/category/attribute].import.custom.save, method: importCustomFromCSV }
Currently available events are product.import.custom.save, category.import.custom.save and attribute.import.custom.save.
In listener you will implement your custom logic for importing csv.
<?php

use Alligator\Business\Event\AbstractEvent\EventWithResult;

/**
* Class TestMenuLinkListener
*/
class TestImportListener
{

    /**
     * Custom import entities from csv
     */
    public function importCustomFromCSV(EventWithResult $event)
    {
        //custom logic for import
    }
}
How to add new route(entity) to menu link generator ?
You can easily add new routes to menu link generator by providing route name and/or route name that is responsible for filtering entities(in most cases jqgrid function will do the work)
empire.menu.links.event
This event is dispatched in MenuItemManager class in getMenuLinks method which is called every time user visits page for editing menu items.
In order to add new routes to menu link generator we first need to create listener which will be listing to empire.menu.links.event event.
name_of_the_listener:
    class: ClassNameWithNamespace
    tags: [{name: kernel.event_listener, event: empire.menu.links.event, method: 'addMenuLinkData'}]
Now let's create class with addMenuLinkData method.
<?php

use Alligator\Business\Event\Route\PluginRouteLinkEvent;

/**
* Class TestMenuLinkListener
*/
class TestMenuLinkListener
{

    /**
     * Set result for empire.menu.links.event event
     *
     * @param PluginRouteLinkEvent $event
     */
    public function addMenuLinkData(PluginRouteLinkEvent $event)
    {
        ...
    }
}
And add new routes to menu link generator by adding new result to event. Result should be array that contain all keys from PluginRouteLinkEvent class.
All keys required by menu link generator are:
- ROUTE_ID - route name
- ROUTE_NAME_KEY - route name
- ROUTE_NEEDS_IDENTIFIER_KEY - boolean variable which indicates if search should be applied
- ROUTE_ENTITY_CLASS - Full class name(with namespace) if search should be applied, field name otherwise
- ROUTE_SEARCH_FIELD_NAME - Field to be used in search, null otherwise
- ROUTE_SEARCH_ROUTE - Route name which will do the search
Example of adding new single route(without search entities)
$event->addResult(
    [
        PluginRouteLinkEvent::ROUTE_ID => 'test_route_name',
        PluginRouteLinkEvent::ROUTE_NAME_KEY => 'test_route_name',
        PluginRouteLinkEvent::ROUTE_NEEDS_IDENTIFIER_KEY => false,
        PluginRouteLinkEvent::ROUTE_ENTITY_CLASS => 'All test entities',
        PluginRouteLinkEvent::ROUTE_SEARCH_FIELD_NAME => null,
        PluginRouteLinkEvent::ROUTE_SEARCH_ROUTE => null,
    ]
);
Example of adding multiple routes(adding search option for entities)
$event->addResult(
    [
        PluginRouteLinkEvent::ROUTE_ID => 'test_route_name',
        PluginRouteLinkEvent::ROUTE_NAME_KEY => 'test_route_name',
        PluginRouteLinkEvent::ROUTE_NEEDS_IDENTIFIER_KEY => true,
        PluginRouteLinkEvent::ROUTE_ENTITY_CLASS => TestModelClass::class,
        PluginRouteLinkEvent::ROUTE_SEARCH_FIELD_NAME => 'test_field',
        PluginRouteLinkEvent::ROUTE_SEARCH_ROUTE => 'search_test_route_name',
    ]
);
How to sync order to external software, like ERP ?
order.before.success.db.edit
This event is dispatched in CheckoutFrontendController class in checkoutSuccessAction method. It is useful because in this place the order can be synchronized with external software and changed depending on the API response.
<?php

use Symfony\Component\EventDispatcher\EventSubscriberInterface;
use Symfony\Component\EventDispatcher\Event;
use Alligator\Model\OrderBundle\Entity\Order;
use Alligator\Business\Event\Order\OrderEvent;

class TestEventSubscriber implements EventSubscriberInterface
{

    public static function getSubscribedEvents()
    {
            return [
            'order.after.cart.success' => 'processOrderAfterAddToCart',
        ];
    }

    /**
     * @param OrderEvent $event
     * @return OrderEvent
     */
    public function processOrderAfterAddToCart(OrderEvent $event)
    {
        $order = $event->getOrder();

        //Modify order and call external api, for example use callAPI
        // $data = ...transform order to data...
        //$result = $this->callAPI('POST', 'example.com/url', $data)
        //... now you can change order based on the result....
        //$order = ......

        return $event->setResult($order);
    }

    private function callAPI($method, $url, $data = false)
    {
        $curl = curl_init();

        switch ($method)
        {
            case "POST":
                curl_setopt($curl, CURLOPT_POST, 1);

                if ($data)
                    curl_setopt($curl, CURLOPT_POSTFIELDS, $data);
                break;
            case "PUT":
                curl_setopt($curl, CURLOPT_PUT, 1);
                break;
            default:
                if ($data)
                    $url = sprintf("%s?%s", $url, http_build_query($data));
        }

        // Optional Authentication:
        curl_setopt($curl, CURLOPT_HTTPAUTH, CURLAUTH_BASIC);
        curl_setopt($curl, CURLOPT_USERPWD, "username:password");

        curl_setopt($curl, CURLOPT_URL, $url);
        curl_setopt($curl, CURLOPT_RETURNTRANSFER, 1);

        $result = curl_exec($curl);

            curl_close($curl);

            return $result;
    }
}
And a services.yml:
f_webshop.listener.testsubscriber:
    class: Plugins\TestPlugin\Business\Event\TestEventSubscriber
    tags:
        - { name: kernel.event_subscriber }
How to extend base model
Here you will learn how to extend models. Our bundle allows you to override entities by using inheritance.
Let's assume our Product needs one more field. In this case we will create new Product and extend base one.
Base product
Alligator\Model\ProductBundle\Entity\Product
namespace Alligator\Model\ProductBundle\Entity;

use Alligator\Adapter\AttributeSet\AttributeSetDeserializer;
use Alligator\Annotation\Annotation\ExcludeLoggable;
use Alligator\Business\CSV\AbstractStreamWriter;
use Alligator\Interfaces\Block\BlockEntity;
use Alligator\Model\AttributeBundle\Entity\AttributeValue;
use Alligator\Model\CategoryBundle\Entity\Category;
use Alligator\Model\Core\Product\Model\Product as BaseProduct;
use Alligator\Model\Core\Resource\Model\CSVEntityInterface;
use Alligator\Model\Core\Resource\Model\PrimaryKeyInterface;
use Alligator\Model\Core\Resource\Model\RelationshipEntityInterface;
use Alligator\Model\Core\Traits\UpdatedByTrait;
use Alligator\Model\DocumentBundle\Entity\File;
use Alligator\Model\DocumentBundle\Entity\Image;
use Alligator\Model\OrderBundle\Entity\OrderItem;
use Alligator\Model\PricelistBundle\Entity\PricelistItem;
use Alligator\Model\StatisticsBundle\Entity\Statistics;
use Doctrine\Common\Collections\ArrayCollection;
use Doctrine\ORM\Mapping as ORM;
use JMS\Serializer\Annotation as JMS;
use Alligator\Annotation\Annotation\Loggable;

/**
 * Product
 *
 * @ORM\Table("al_product", indexes={@ORM\Index(name="sales_idx", columns={"sales"})}, options={"comment":"Main product class"})
 * @ORM\Entity(repositoryClass="Alligator\Business\Database\Product\ProductRepository")
 * @ORM\HasLifecycleCallbacks
 *
 * @JMS\ExclusionPolicy("all")
 *
 * @Loggable()
 */
class Product extends BaseProduct implements PrimaryKeyInterface, \Serializable, CSVEntityInterface, BlockEntity, RelationshipEntityInterface
{
    use UpdatedByTrait;

    /**
     * @var int
     *
     * @ORM\Column(name="id", type="integer")
     * @ORM\Id
     * @ORM\GeneratedValue(strategy="AUTO")
     *
     * @JMS\Type("integer")
     * @JMS\Expose
     * @JMS\Groups({"product-edit", "product-jqgrid-list", "related-products", "single-page", "featured-products", "category-page", "cat-category-page", "product-compare", "product-attr-compare"})
     */
    protected $id;

    ... Other base product fields and methods ...

}
Now let's create our new product which needs to extend the base one
Namespace\To\Our\New\Entity\Product
namespace Namespace\To\Our\New\Entity;

use Doctrine\ORM\Mapping as ORM;
use JMS\Serializer\Annotation as JMS;
use Alligator\Annotation\Annotation\Loggable;
use Alligator\Model\ProductBundle\Entity\Product as BaseProduct;

/**
 * Product
 *
 * @ORM\Table("al_product", indexes={@ORM\Index(name="sales_idx", columns={"sales"})}, options={"comment":"Main product class"})
 * @ORM\Entity(repositoryClass="Alligator\Business\Database\Product\ProductRepository")
 * @ORM\HasLifecycleCallbacks
 *
 * @JMS\ExclusionPolicy("all")
 *
 * @Loggable()
 */
class Product extends BaseProduct
{


    /**
     * @var strine|null
     *
     * @ORM\Column(name="new_field", type="string", length=255, nullable=true)
     *
     * @JMS\Type("string")
     * @JMS\Expose
     */
    protected $newField;

}
Hints:
- If you are using multi level inheritance, you have to use the top most super class on the left side in the configuration under overridden_entities.
- If you are using multi level inheritance, the properties of the class in between have to be protected, otherwise you will get a ReflectionException saying Property ...::$propertyName does not exist.
- It is recommended that the original entity is defined as MappedSuperclass. You can do so if it is your own code. If you want to extend other, third party entities, this should work in most cases. But parts of the mapping will be regenerated internally by the LoadORMMetadataSubscriber of this bundle and at least some doctrine mapping features might not be supported and you might run into issues.
- Using @ORM\AttributeOverrides is not supported, instead just override the property in your customized entity class and add the ORM mapping for the property in your customized entity as usual. This bundle will then unload the original mapping configuration and only use your customized mapping.
Now all you need to do is to add this to configuration (config.yml).
shop_entity_override:
    overridden_entities:
        Alligator\Model\Core\Product\Model\Product: Namespace\To\Our\New\Entity\Product
And that's it.
How to override service
Here you will learn how to override services.
Let's assume we extended our Product entity and now we need to create method which will update newly created field.
Now we will create our ProductManager, extend base one and add new logic.
Namespace\To\Our\New\Manager\Business\Manager\ProductManager
namespace Namespace\To\Our\New\Manager\Business\Manager\ProductManager;

use Alligator\Business\Manager\Product\ProductManager as BaseProductManager;
use Alligator\Model\Core\Resource\Model\PrimaryKeyInterface;

class ProductManager extends BaseProductManager
{

    /**
    * Update new field value for specific product
    * @param int    $id
    * @param string $newValue
    *
    * @return PrimaryKeyInterface|int|null
    */
    protected function updateNewField($id, $newValue)
    {
        $databaseProduct = $this->getReference($id);

        $databaseProduct->setNewField($newValue);

        return $this->repository->edit($databaseProduct);
    }

}
Now all you need to do is to add this to configuration (config.yml). Key of the mappings needs to be base service ID.
shop_entity_override:
    overridden_services:
        alligator.product_manager:
            class: Namespace\To\Our\New\Manager\Business\Manager\ProductManager
If you want to add another service to the extended object you can do that by passing additional_arguments key
shop_entity_override:
    overridden_services:
        alligator.product_manager:
            class: Namespace\To\Our\New\Manager\Business\Manager\ProductManager
            additional_arguments: ["@some_new_service"]
And that's it.
How to customize product response message
This chapter will tell you how to customize response message for add/remove product to/from shopping cart, wish list and compare lists.
All you need to do is to create template in other section (Admin dashboard -> Plugins -> Block Elements -> Manage Templates) with name:
toastr-item.html.twig
Variable data is provided for this template. It contains message, product, and if action is about shopping cart orderItem is also included in data variable.
toastr-item.html.twig
{% set product = data.product %}
<div class="toastr-info-message">
    <i class="fa fa-check"></i> {{ data.message }}
</div>
<div class="toastr-product-preview">
    <div class="product-item">
        <a class="product-item-photo" href="#" title="{{ translate_product(product.id) }}">
            {% if product.baseImageUrl is defined and product.baseImageUrl %}
                <img src="{{ product.baseImageUrl }}" class="img img-responsive" alt="{{ translate_product(product.id) }}">
            {% else %}
                <img src="{{ asset('Resource/FrontendTheme/images/default_product.png') }}"  alt="{{ translate_product(product.id) }}">
            {% endif %}
        </a>
        <div class="product-item-details">
            <a href="{{ permalink_path({'_locale': app.session.get('_locale'), 'entity': product, 'permalink': translate_product_permalink(product.id)}) }}">
                {{ translate_product(product.id) }}
            </a>
            <span class="sku">{{ product.sku }}</span>
            {% if data.price is defined and data.price %}
                <span class="price">{{ data.price| alligator_json_convert(app.session.get('current_currency')) | alligator_money_format }}</span>
            {% endif %}
        </div>
    </div>
</div>
How to get custom template
This chapter is about overriding templates. If you need to render another template instead of base one you can do that by getting new template with event.
Let's see how we can do this. First we will need instance of
Symfony\Component\EventDispatcher\EventDispatcher
which will dispatch our event for new template.
...

public function getNewTempate()
{
    $dispatcher = $this->container->get('event_dispatcher');
    $event = new EventWithResult();
    $dispatcher->dispatch('get.our.new.template.event', $event);

    return $event->getResult();
}

...
Now we need to create our listener which will listen for get.our.new.template.event event
class OurNewListener
{
    public function overrideTemplateWithNewOne(EventWithResult $event)
    {
        $event->setResult('@newTemplateViews/new-template.html.twig');
    }
}
Register this listener and hook on get.our.new.template.event event
our_new_listener_service:
    class: OurNewListener
    tags:
        - { name: kernel.event_listener, event: get.our.new.template.event, method: overrideTemplateWithNewOne }
How to create your own algorithm
This chapter is about creating and registering algorithms. We use algorithms to provide necessary data to twig.
There are many available algorithms such as:
- Most viewed products
- Best seller products
- User last viewed products
- Best seller products user not bought
- Custom (selected by user) products
- Custom (selected by user) albums
- Get by id (for many entities such as product, declaration, blog post, category...)
And many other algorithms.
Before we start creating our algorithm there are some rules that needs to be met:
- Related entity must implement
Alligator\Interfaces\Block\BlockEntityinterface - Related manager must use
Alligator\Business\Manager\Traits\BlockElementManagerTraittrait - Related repository must implement
Alligator\Business\Database\AbstractDB\AbstractBlockElementRepositoryInterfaceinterface
Now let's create algorithm for slider
Alligator\Model\SlideBundle\Entity\Slide
In order to create our own algorithm we need to follow some rules. First we need create listener which will contain our new algorithm and register it.
Let's create slider algorithm where we will select custom list of sliders. We will name it SliderBlockElementsListener
Our new listener should extend
Alligator\Business\Event\AbstractEvent\AbstractBlockElementListener.
class SliderBlockElementsListener extends AbstractBlockElementListener
{

    /**
     * @inheritdoc
     */
    protected function proceedResultDataParams()
    {
        return [
            'showAsEntity' => true,
        ];
    }

    /**
     * @inheritdoc
     */
    protected function getTwigFunction(EventWithResult $event)
    {
        switch ($event->getParam()['algorithm']) {
            case 'custom_list':
                return 'slider_block_elements_by_id(['.implode(',', $event->getParam()['algorithmParams']['entities']).'])';
        }
    }

    /**
     * @inheritdoc
     */
    protected function getAvailableAlgorithms()
    {
        return [
            $this->getClassName(Slide::class) => [
                'custom_list' => [
                    'algorithmName' => 'Custom list',
                    'params'        => [
                        BlockElementParamTypes::select('slide_jqgrid', 'slideName', null, true),
                    ],
                ],
            ],
        ];
    }
}
In order to see newly created algorithm in backend we need to enable entity so it can be listed in dropdown. We use proceedResultDataParams method for that.
protected function proceedResultDataParams()
{
    return [
        'showAsEntity' => true,
    ];
}
Now we will list all available algorithms and their input arguments. For that we use getAvailableAlgorithms method.
protected function getAvailableAlgorithms()
{
    return [
        $this->getClassName(Slide::class) => [
            'custom_list' => [
                'algorithmName' => 'Custom list',
                'params'        => [
                    BlockElementParamTypes::select('slide_jqgrid', 'slideName', null, true),
                ],
            ],
        ],
    ];
}
Because listener can contain algorithms related to other entities, not just one, we need to provide information for which entity are those algorithms $this->getClassName(Slide::class).
Key custom_list must be unique in this listener because he is later used to map algorithm with appropriate extension.
algorithName is name of algorithm which users sees.
params key contains all algorithm arguments. In this case it is field for searching sliders.
See
Plugins\EmpireBlockElementsPlugin\Model\BlockElementParamTypes
for all available algorithm argument types
Third method getTwigFunction is used to map algorithm with appropriate twig extension
protected function getTwigFunction(EventWithResult $event)
{
    switch ($event->getParam()['algorithm']) {
        case 'custom_list':
            return 'slider_block_elements_by_id(['.implode(',', $event->getParam()['algorithmParams']['entities']).'])';
    }
}
Now we need to register our listener. To do that we need to hook on
block.elements.get.construct.params
empire.slider.block.listener:
    class: Plugins\EmperorSliderPlugin\Business\Event\SliderBlockListener
    arguments: ['@alligator.slide_manager']
    tags:
        - { name: kernel.event_listener, event: block.elements.get.construct.params, method: getBlockListenerParams }
Listener which hooks on this event should extend
Alligator\Business\Event\AbstractEvent\AbstractPluginBlockElementListener
This listener is used to provide appropriate manager, class and listener, which we created, for new algorithm.
class SliderBlockListener extends AbstractPluginBlockElementListener
{
    /**
     * @var SlideManager
     */
    private $manager;

    /**
     * @param SlideManager $manager
     */
    public function __construct(SlideManager $manager)
    {
        $this->manager = $manager;
    }

    /**
     * @inheritdoc
     */
    protected function getParams()
    {
        return [
            'class'     => Slide::class,
            'listener'  => SliderBlockElementsListener::class,
        ];
    }

    /**
     * @inheritdoc
     */
    protected function getManager()
    {
        return $this->manager;
    }
}
And that's it. Now you can go to backend and test your algorithm.
How to override adapter and create entity relationship
In this section you will learn how to override adapter so you can change some converter and create relationship between entities.
Let's create relationship between blog categories. For example, we have some blog category with slug for specific locale and if we change locale we won't have any blog category with that slug for new locale. We can create relationship between our blog category and another one which we want to be shown for new locale instead of our current.
To create new relationship go to admin panel and navigate to
Plugins -> Entity Relationship -> Add new.
There create new relationship with name language_relationship_for_blog_category and select main blog category and the other one, which will be shown instead of main.
After we created relationship, we need to override appropriate adapter so we can change converter to new one which we will create now.
In our
Plugins\EmpireBlogPlugin\Routing\BlogController
we can see that for listing all blog posts for specific blog category is used
Plugins\EmpireBlogPlugin\Adapter\BlogPost\BlogPostsByCategoryConverter
So let's create our new converter same as BlogPostsByCategoryConverter but with one additional functionality. If specific blog category is not found and have related entities throw new RedirectRouteException to redirect to that, related, entity.
namespace Plugins\EmpireBlogPlugin\Adapter\BlogPost;

use Alligator\Adapter\BasicConverter;
use Doctrine\Common\Collections\ArrayCollection;
use Doctrine\ORM\NonUniqueResultException;
use Doctrine\ORM\NoResultException;
use Plugins\EmpireBlogPlugin\Business\Manager\BlogPostManager;

class OurNewBlogPostsByCategoryConverter extends BasicConverter
{
    /** @var BlogPostManager */
    protected $manager;

    /**
     * @throws NoResultException
     * @throws NonUniqueResultException
     *
     * @inheritdoc
     */
    public function convert()
    {
        $page = 1;
        $offset = 6;
        $slug = $this->request->get('slug');
        $locale = $this->request->get('_locale');
        if (substr($slug, -1) === '/') {
            $slug = substr($slug, 0, strlen($slug) - 1);
        }

        $category = $this->manager->findCategoryBySlug($slug, $locale);
        if ($category && ($categoryId = $category->getId())) {
            $postsCount = $this->manager->countPostsPaginationByCategory($categoryId, $category->getLft(), $category->getRgt());
            $blogPosts = $this->manager->findAllCustomForFrontendByCategory($page, $offset, $categoryId, $category->getLft(), $category->getRgt());
            $this->request->attributes->set(
                $this->param,
                new ArrayCollection(
                    array(
                        $blogPosts,
                        $postsCount,
                        $category,
                    )
                )
            );

            return;
        }

        if (($replacement = $this->manager->getLanguageRelatedEntity($slug, $locale)) && \is_array($replacement) && \count($replacement)) {
             throw new RedirectRouteException('blog_posts_view_by_category_front', [
                '_locale' => $this->request->get('_locale'),
                'slug' => reset($replacement)->getSlug(),
             ]);
        }

        $this->request->attributes->set($this->param, new ArrayCollection(array(null)));
    }
}
Now we need to override appropriate adapter and change BlogPostsByCategoryConverter with the one we just created.
To do that all we need to do is to add new value under shop_entity_override -> overridden_services in config.yml
shop_entity_override:
    overridden_services:
        alligator.blog.post.adapter: Plugins\EmpireBlogPlugin\Adapter\BlogPost\OurNewBlogPostAdapter
Here is our new adapter. Because we want to use existing adapter util we also override getAdapterUtil method
namespace Plugins\EmpireBlogPlugin\Adapter\BlogPost;

use Alligator\Adapter\BaseAdapter;
use Plugins\EmpireBlogPlugin\Business\Manager\BlogPostManager;
use Symfony\Component\HttpFoundation\Request;

class OurNewBlogPostAdapter extends BaseAdapter
{
    /** @var BlogPostManager */
    protected $blogPostManager;

    /**
     * BlogPostAdapter constructor.
     * @param BlogPostManager $blogPostManager
     */
    public function __construct(BlogPostManager $blogPostManager)
    {
        $this->blogPostManager = $blogPostManager;
    }

    /**
     * @inheritdoc
     */
    public function buildConverterInstance($param, Request $request)
    {
        if ($param === 'blogPostsByCategory') {
            $type = 'Plugins\EmpireBlogPlugin\Adapter\BlogPost\OurNewBlogPostsByCategoryConverter';
        } else {
            $class = $this->getAdapterUtil();
            $type = $this->getNameSpace().'\\'.ucfirst($param).$class::BASE_CONVERTER_NAME;
        }

        return new $type($this->blogPostManager, $request, $param);
    }

    /**
     * @inheritdoc
     */
    public function getAdapterUtil()
    {
        return BlogPostAdapterUtil::class
    }
}
The only thing that is left to us is to see what getLanguageRelatedEntity needs to do.
public function getLanguageRelatedEntity($slug, $locale)
{
    $paramBag = [
        [
            'field' => 'slug',
            'value' => $slug,
        ],
    ];

    return $this->dispatcher->dispatch(BlogCategory::class, $paramBag, $locale);
}
As we can see all what this method needs to do is to dispatch event with appropriate parameters. You can implement this method overriding BlogPostManager same as we override our adapter.
How to use category decorator
In this chapter you will learn how to convert tree structure to HTML. For this we are using tree structure decorator.
Customize html tree output, basic usage, only representing HTML:
$repo = $em->getRepository('Alligator\Model\CategoryBundle\Entity\Category');
$options = array(
    'decorate' => true,
    'rootOpen' => '<ul>',
    'rootClose' => '</ul>',
    'childOpen' => '<li>',
    'childClose' => '</li>',
    'nodeDecorator' => function($node) {
        return '<a href="/page/'.$node['slug'].'">'.$node[$field].'</a>';
    }
);
$htmlTree = $repo->childrenHierarchy(
    null, /* starting from root nodes */
    false, /* false: load all children, true: only direct */
    $options
);
Every theme has its own category tree structure decorator.
Now you will see how you can generate routes and use other services in decorator.
$categoryManger = $this->categoryManager;
$options = array(
    'decorate' => true,
    'rootOpen' => function ($tree) {
        if (count($tree)) {
            /** 1 -> 2 */
            if ($tree[0]['lvl'] === 2) {
                $styleBcg = ($img = $this->getImageOfParent($tree[0]['id'])) ? 'style="background-image: url('.$img.');"' : '';

                return '<div class="submenu" '.$styleBcg.'><ul class="categori-list clearfix">';
                /** 0 -> 1 */
            }
            if ($tree[0]['lvl'] === 1) {
                return '<ul class="ui-categori">';
            }

            return '<ul class="ul-subcat-'.$tree[0]['lvl'].'">';
        }
    },
    'rootClose' => function ($tree) {
        if (count($tree)) {
            /** 1 -> 2 */
            if ($tree[0]['lvl'] === 2) {
                return '</ul></div>';
            }

            return '</ul>';
        }
    },
    'childOpen' => function ($node) {
        /** 0 -> 1 */
        if ($node['lvl'] === 1) {
            if (strpos($node['icon'], '<svg') === 0) {
                $icon = $node['icon'];
            } else {
                $icon = '<i class ="fa "'.$node['icon'].'"></i>';
            }

            if ($node['hasActiveCategories']) {
                return '<li class="parent" data-category-id="'.$node['id'].'"> '.$icon;

            }

            return '<li class="" data-category-id="'.$node['id'].'"> '.$icon;
            /** 1 -> 2 */
        }
        if ($node['lvl'] === 2) {
            if ($node['hasActiveCategories']) {
                return '<li class="subcat" data-category-id="'.$node['id'].'">';
            }

            return '<li data-category-id="'.$node['id'].'">';
        }

        if ($node['hasActiveCategories']) {
            return '<li class="subcat" data-category-id="'.$node['id'].'">';
        }

        return '<li data-category-id="'.$node['id'].'">';
    },
    'childClose' => '</li>',
    'childSort' => array('field' => 'position', 'dir' => 'asc'),
    'nodeDecorator' => function ($node) use ($categoryManger, $event) {
        $hasChild = function ($treeNode) {
            return (bool) $treeNode['hasActiveCategories'];
        };

        $locale = !is_string($event->getLocale()) ? $event->getLocale()['locale'] : $event->getLocale();

        $route = $categoryManger->generateRoute('category_front', array('slug' => $node['slug'], '_locale' => $locale));

        $categoryName = $this->categoryManager->transCategory('category.'.$node['id'].'.name', $locale);
        $categoryName = \strlen($categoryName = substr($categoryName, 0, 42)) > 41 ? $categoryName.'...' : $categoryName;
        if ($hasChild($node)) {
            /** 1 -> 2 */
            if ($node['lvl'] === 2) {
                return '<strong class="title"><a data-slug="'.$node['slug'].'" title="'.$node['name'].'" href="'.$route.'">'.$categoryName.' </a><span class="toggle-submenu"></span></strong>';
            }

            return '<a data-slug="'.$node['slug'].'" title="'.$node['name'].'" href="'.$route.'">'.$categoryName.' </a><span class="toggle-submenu"></span>';

        }
        /** 1 -> 2 */
        if ($node['lvl'] === 2) {
            return '<strong class="title"><a data-slug="'.$node['slug'].'" title="'.$node['name'].'" href="'.$route.'">'.$categoryName.' </a></strong>';
        }

        return '<a data-slug="'.$node['slug'].'" title="'.$node['name'].'" href="'.$route.'">'.$categoryName.' </a>';
    },

);
category.decorator.data.event
If you want to use your own decorator, for example, you need another HTML structure you can to that by hooking on
category.decorator.data.event
This event receives Alligator\Business\Event\Category\CategoryEvent. All you need to do is:
$options = (
 Your custom decorator code goes here
 );

 $event->setResult($options);
And that's it!
Here are some helpful repository methods that you can use:
- getRootNodes / getRootNodesQuery / getRootNodesQueryBuilder: Returns an array with the available root nodes. Arguments:
- sortByField: An optional field to order the root nodes. Defaults to "null".
- direction: In case the first argument is used, you can pass the direction here: "asc" or "desc". Defaults to "asc".
- getChildren / getChildrenQuery / getChildrenQueryBuilder: Returns an array of children nodes. Arguments:
- node: If you pass a node, the method will return its children. Defaults to "null" (this means it will return ALL nodes).
- direct: If you pass true as a value for this argument, you'll get only the direct children of the node (or only the root nodes if you pass "null" to the "node" argument).
- sortByField: An optional field to sort the children. Defaults to "null".
- direction: If you use the "sortByField" argument, this allows you to set the direction: "asc" or "desc". Defaults to "asc".
- includeNode: Using "true", this argument allows you to include in the result the node you passed as the first argument. Defaults to "false".
- childrenHierarchy: This useful method allows you to build an array of nodes representing the hierarchy of a tree. Arguments:
- node: If you pass a node, the method will return its children. Defaults to "null" (this means it will return ALL nodes).
- direct: If you pass true as a value for this argument, you'll get only the direct children of the node
- options: An array of options that allows you to decorate the results with HTML. Available options:
- decorate: boolean (false) - retrieves tree as UL->LI tree
- nodeDecorator: Closure (null) - uses $node as argument and returns decorated item as string
- rootOpen: string || Closure (
<ul>) - branch start, closure will be given $children as a parameter - rootClose: string (
</ul>) - branch close - childStart: string || Closure (
<li>) - start of node, closure will be given $node as a parameter - childClose: string (
</li>) - close of node - childSort: array || keys allowed: field: field to sort on, dir: direction. 'asc' or 'desc'
- includeNode: Using "true", this argument allows you to include in the result the node you passed as the first argument. Defaults to "false".
How to use declaration decorator
In this chapter you will learn how to convert tree structure to HTML. For this we are using tree structure decorator.
Customize html tree output, basic usage, only representing HTML:
$repo = $em->getRepository('Plugins\EmberMenuPlugin\Model\Declaration');
$options = array(
    'decorate' => true,
    'rootOpen' => '<ul>',
    'rootClose' => '</ul>',
    'childOpen' => '<li>',
    'childClose' => '</li>',
    'nodeDecorator' => function($node) {
        return '<a href="/page/'.$node['slug'].'">'.$node[$field].'</a>';
    }
);
$htmlTree = $repo->childrenHierarchy(
    null, /* starting from root nodes */
    false, /* false: load all children, true: only direct */
    $options
);
Every theme has its own menu declaration decorator.
Now you will see how you can generate routes and use other services in decorator.
$options = array(
    'decorate' => true,
    'rootOpen' => '',
    'rootClose' => '',
    'childOpen' => function ($node) use ($currentFrontEndThemeDIR, $schemeAndHost) {
        $html = '';
        $nodeHasItems = $node['numberOfItems'] > 0;
        if ($nodeHasItems) {
            if (0 === $node['lvl']) {
                $imagePath = $node['imagePath'];
                if (null === $imagePath) {
                    $imagePath = $schemeAndHost.'/'.$currentFrontEndThemeDIR.'images/declarations-default.png';
                }
                $html = '<div class="panel"><a href="#deklaracije'.$node['id'].'" data-toggle="collapse" data-parent="#deklaracije"
            style="background-image:url('.$imagePath.')"
            class="list-group-item list-group-item-success main-link">';
                if ($node['displayTitle']) {
                    $html = $html.'<span class="declaration-title">'.$node['name'].'</span>';
                }
                $html .= '</a>';
                if ($nodeHasItems || $node['rgt'] - $node['lft'] > 1) {
                    $html = $html.'<div id="deklaracije'.$node['id'].'" class="collapse">';
                }
            } else {
                $icon = '';
                if ($nodeHasItems || ($node['rgt'] - $node['lft'] > 1)) {
                    $icon = '<i class="fa fa-chevron-left"></i>';
                }
                $html = '<a href="#deklaracije'.$node['id'].'" data-toggle="collapse" data-parent="#deklaracije'.$node['id'].'"
            class="list-group-item collapsed">'.$node['name'].$icon.'</a>';
                if ($nodeHasItems || $node['rgt'] - $node['lft'] > 1) {
                    $html = $html.'<div id="deklaracije'.$node['id'].'" class="list-group-submenu collapse">';
                }
            }
        }

        return $html;
    },
    'childClose' => function ($node) {
        $nodeHasItems = $node['numberOfItems'] > 0;
        if ($nodeHasItems) {
            if (0 === $node['lvl']) {
                if ($nodeHasItems || $node['rgt'] - $node['lft'] > 1) {
                    return '</div></div>';
                }

                return '</div>';
            }
            if ($nodeHasItems || ($node['rgt'] - $node['lft'] > 1)) {
                return '</div>';
            }
        }

        return '';
    },
    'nodeDecorator' => function ($node) {
        $declarations = '';
        if (sizeof($node['declarations']) > 0) {
            $declarations = '<ul>  ';
            foreach ($node['declarations'] as $dec) {
                $declarations = $declarations.'<li class="accordian-answer">
            <a href="'.$dec['path'].'" target="_blank"><i class="ti-clip"></i>'.$dec['title'].'</a>
            </li>';
            }
        }

        return $declarations.'</ul>';
    },
);
decorator.category.data.event
If you want to use your own decorator, for example, you need another HTML structure you can to that by hooking on
decorator.category.data.event
This event receives Alligator\Business\Event\Category\CategoryEvent. All you need to do is:
$options = (
 Your custom decorator code goes here
 );

 $event->setResult($options);
And that's it!
Here are some helpful repository methods that you can use:
- getRootNodes / getRootNodesQuery / getRootNodesQueryBuilder: Returns an array with the available root nodes. Arguments:
- sortByField: An optional field to order the root nodes. Defaults to "null".
- direction: In case the first argument is used, you can pass the direction here: "asc" or "desc". Defaults to "asc".
- getChildren / getChildrenQuery / getChildrenQueryBuilder: Returns an array of children nodes. Arguments:
- node: If you pass a node, the method will return its children. Defaults to "null" (this means it will return ALL nodes).
- direct: If you pass true as a value for this argument, you'll get only the direct children of the node (or only the root nodes if you pass "null" to the "node" argument).
- sortByField: An optional field to sort the children. Defaults to "null".
- direction: If you use the "sortByField" argument, this allows you to set the direction: "asc" or "desc". Defaults to "asc".
- includeNode: Using "true", this argument allows you to include in the result the node you passed as the first argument. Defaults to "false".
- childrenHierarchy: This useful method allows you to build an array of nodes representing the hierarchy of a tree. Arguments:
- node: If you pass a node, the method will return its children. Defaults to "null" (this means it will return ALL nodes).
- direct: If you pass true as a value for this argument, you'll get only the direct children of the node
- options: An array of options that allows you to decorate the results with HTML. Available options:
- decorate: boolean (false) - retrieves tree as UL->LI tree
- nodeDecorator: Closure (null) - uses $node as argument and returns decorated item as string
- rootOpen: string || Closure (
<ul>) - branch start, closure will be given $children as a parameter - rootClose: string (
</ul>) - branch close - childStart: string || Closure (
<li>) - start of node, closure will be given $node as a parameter - childClose: string (
</li>) - close of node - childSort: array || keys allowed: field: field to sort on, dir: direction. 'asc' or 'desc'
- includeNode: Using "true", this argument allows you to include in the result the node you passed as the first argument. Defaults to "false".
How to use menu builder decorator
In this chapter you will learn how to convert tree structure to HTML. For this we are using tree structure decorator.
Customize html tree output, basic usage, only representing HTML:
$repo = $em->getRepository('Plugins\EmberMenuPlugin\Model\MenuItem');
$options = array(
    'decorate' => true,
    'rootOpen' => '<ul>',
    'rootClose' => '</ul>',
    'childOpen' => '<li>',
    'childClose' => '</li>',
    'nodeDecorator' => function($node) {
        return '<a href="/page/'.$node['slug'].'">'.$node[$field].'</a>';
    }
);
$htmlTree = $repo->childrenHierarchy(
    null, /* starting from root nodes */
    false, /* false: load all children, true: only direct */
    $options
);
Every theme has its own menu tree structure decorator.
Now you will see how you can generate routes and use other services in decorator.
$options = array(
    'decorate' => true,
    'rootOpen' => function ($tree) {
        if (\count($tree)) {
            if ($tree[0]['lvl'] === 2) {
                return '<div class="dropdown-menu-list"><ul class="container">';
                /** 0 -> 1 */
            }
            if ($tree[0]['lvl'] === 1) {
                return '<ul class="nav navbar-nav">';
            }

            return '<ul class="ul-subcat-'.$tree[0]['lvl'].'">';
        }
    },
    'rootClose' => function ($tree) {
        if (\count($tree)) {
            if ($tree[0]['lvl'] === 2) {
                return '</ul></div>';
            }

            return '</ul>';
        }
    },
    'childOpen' => function ($node) {
        if ($node['lvl'] === 1) {
            return '<li>';
            /** 1 -> 2 */
        }

        if ($node['lvl'] === 2) {
            return '<li class="subcategory">';
        }

        return '<li>';
    },
    'childClose' => '</li>',
    'childSort' => array('field' => 'position', 'dir' => 'asc'),
    'nodeDecorator' => function ($node) use ($manager, $locale) {
        $currentClass = $node['icon'];
        $hasChild = function ($treeNode) {
            return (bool) $treeNode['rgt'] - $treeNode['lft'] > 1;
        };
        $name = $node['name'];
        if ($node['name'] !== MenuItemAdapterUtil::MAIN_ROOT_NODE_NAME && ($node['link'] || $node['route'])) {
            $route =  $node['link'] ?: $route = $manager->getRouteForNode($node, $locale);
        } else {
            $route = '';
        }
        $icon = $node['icon']? '<i class="fa '.$node['icon'].'"></i>' : '';
        if ($hasChild($node)) {
            return $icon.'<a href="'.$route.'">'.$name.'</a><i class="sidebar-toggle '.$currentClass.'"></i>';
        }

        if ($image = $node['image']) {
            return $icon.'<a class="linkable" href="#" data-href="'.$route.'" data-route='.($node['route'] ? '"1"' : '"0"').'>
                            <div class="img-holder">
                                <img src="'.(new Image())->setName($image['name'])->getWebPath().'" alt="">
                            </div>
                          </a>';
        }

        return $icon.'<a class="linkable" href="#" data-href="'.$route.'" data-route='.($node['route'] ? '"1"' : '"0"').'>'.$name.'</a>';
    },
);
menu.tree.options.signal.event
If you want to use your own decorator, for example, you need another HTML structure you can to that by hooking on
menu.tree.options.signal.event
This event receives Plugins\EmberMenuPlugin\Business\EventŒMenuTreeOptionsEvent. Here you need to provide decorator for every locale. All you need to do is:
foreach ($allLocales as $lcl) {
    $locale = $lcl['locale'];
    $optionsArr = (
     Your custom decorator code goes here
    );
    $options[] = ['locale' => $locale, 'options' => $optionsArr];
}

$event->setResult($options);
And that's it!
Here are some helpful repository methods that you can use:
- getRootNodes / getRootNodesQuery / getRootNodesQueryBuilder: Returns an array with the available root nodes. Arguments:
- sortByField: An optional field to order the root nodes. Defaults to "null".
- direction: In case the first argument is used, you can pass the direction here: "asc" or "desc". Defaults to "asc".
- getChildren / getChildrenQuery / getChildrenQueryBuilder: Returns an array of children nodes. Arguments:
- node: If you pass a node, the method will return its children. Defaults to "null" (this means it will return ALL nodes).
- direct: If you pass true as a value for this argument, you'll get only the direct children of the node (or only the root nodes if you pass "null" to the "node" argument).
- sortByField: An optional field to sort the children. Defaults to "null".
- direction: If you use the "sortByField" argument, this allows you to set the direction: "asc" or "desc". Defaults to "asc".
- includeNode: Using "true", this argument allows you to include in the result the node you passed as the first argument. Defaults to "false".
- childrenHierarchy: This useful method allows you to build an array of nodes representing the hierarchy of a tree. Arguments:
- node: If you pass a node, the method will return its children. Defaults to "null" (this means it will return ALL nodes).
- direct: If you pass true as a value for this argument, you'll get only the direct children of the node
- options: An array of options that allows you to decorate the results with HTML. Available options:
- decorate: boolean (false) - retrieves tree as UL->LI tree
- nodeDecorator: Closure (null) - uses $node as argument and returns decorated item as string
- rootOpen: string || Closure (
<ul>) - branch start, closure will be given $children as a parameter - rootClose: string (
</ul>) - branch close - childStart: string || Closure (
<li>) - start of node, closure will be given $node as a parameter - childClose: string (
</li>) - close of node - childSort: array || keys allowed: field: field to sort on, dir: direction. 'asc' or 'desc'
- includeNode: Using "true", this argument allows you to include in the result the node you passed as the first argument. Defaults to "false".